


 Code 3 Lead
 Code 4 Lead
 Code 5 Lead
 Code 6 Lead






Chimney Lead Flashing – Codes, Sizes, Aprons & Back Gutters Explained
Chimney lead flashing is one of the most important weathering details on any pitched roof. A chimney interrupts the roof covering, changes the water flow across the slope and creates multiple junctions where lead must be formed correctly to keep the structure watertight. If the chimney lead flashing is poorly specified, badly formed or under-sized, the chimney quickly becomes one of the most common sources of water ingress on a roof.
This guide explains how chimney lead flashing works, which lead codes are typically used, how front aprons differ from side flashings and back gutters, and why roof covering type changes the way the detail should be formed. Whether the chimney sits on slate, tile or a more specialist roof build-up, the principles remain the same: the lead must direct water out and away while still allowing sensible movement and long-term durability.
If you already know the code and width you need, move straight into the Lead Chart. For broader support, return to Lead Roofing Guides, browse Lead Flashing, or use The Lead Handbook as your wider reference page.
What chimney lead flashing actually includes
A full chimney lead flashing arrangement is not usually one single piece. It is a collection of coordinated lead details that work together to weather the front, sides and rear of the stack. On most chimneys, this includes a front apron, stepped side flashings or side channels, and some form of back gutter or rear weathering that deals with the higher water load at the uphill side of the chimney.
Where the stack sits within a more complicated roof layout, the rear detail may connect into a valley, central gutter or dedicated outlet. That makes correct sizing and set-out essential. A chimney is not simply another abutment detail; it is a junction with changing water flow, changing roof geometry and multiple lead interfaces all in one place.
- Front apron flashing to weather the downhill face of the chimney
- Side flashings or stepped cover flashings to weather each cheek
- Back gutter or rear weathering detail to direct water around the uphill side
- Chase fixing and finishing to secure the lead into the masonry correctly
Why chimney lead flashing fails so often
Chimney junctions carry a concentrated water load and are exposed to continual thermal movement, wind-driven rain and freeze-thaw conditions. Where chimney lead flashing is under-specified, formed too tightly, fixed badly or sized without enough cover, the defects often appear quickly. The result may be staining, dampness at the chimney breast, saturated roof timbers or repeated localised leakage around the stack.
In many cases, the material itself is not the problem. The real causes are poor detailing decisions: apron cover too short for the tile profile, step flashings not coordinated with the masonry joints, a back gutter formed without enough depth, or movement restricted by over-fixing. These are installation and specification problems, not failures of lead as a roofing material.
Chimney lead flashing on tiled roofs
On tiled roofs, chimney lead flashing often has to work across a deeper and more irregular profile than on slate roofs. The front apron usually needs enough cover to dress cleanly over the tile surface while still maintaining a strong visual line and reliable weathering. Larger profile tiles may justify wider lead than flatter coverings because more material is consumed in dressing over the contours of the roof.

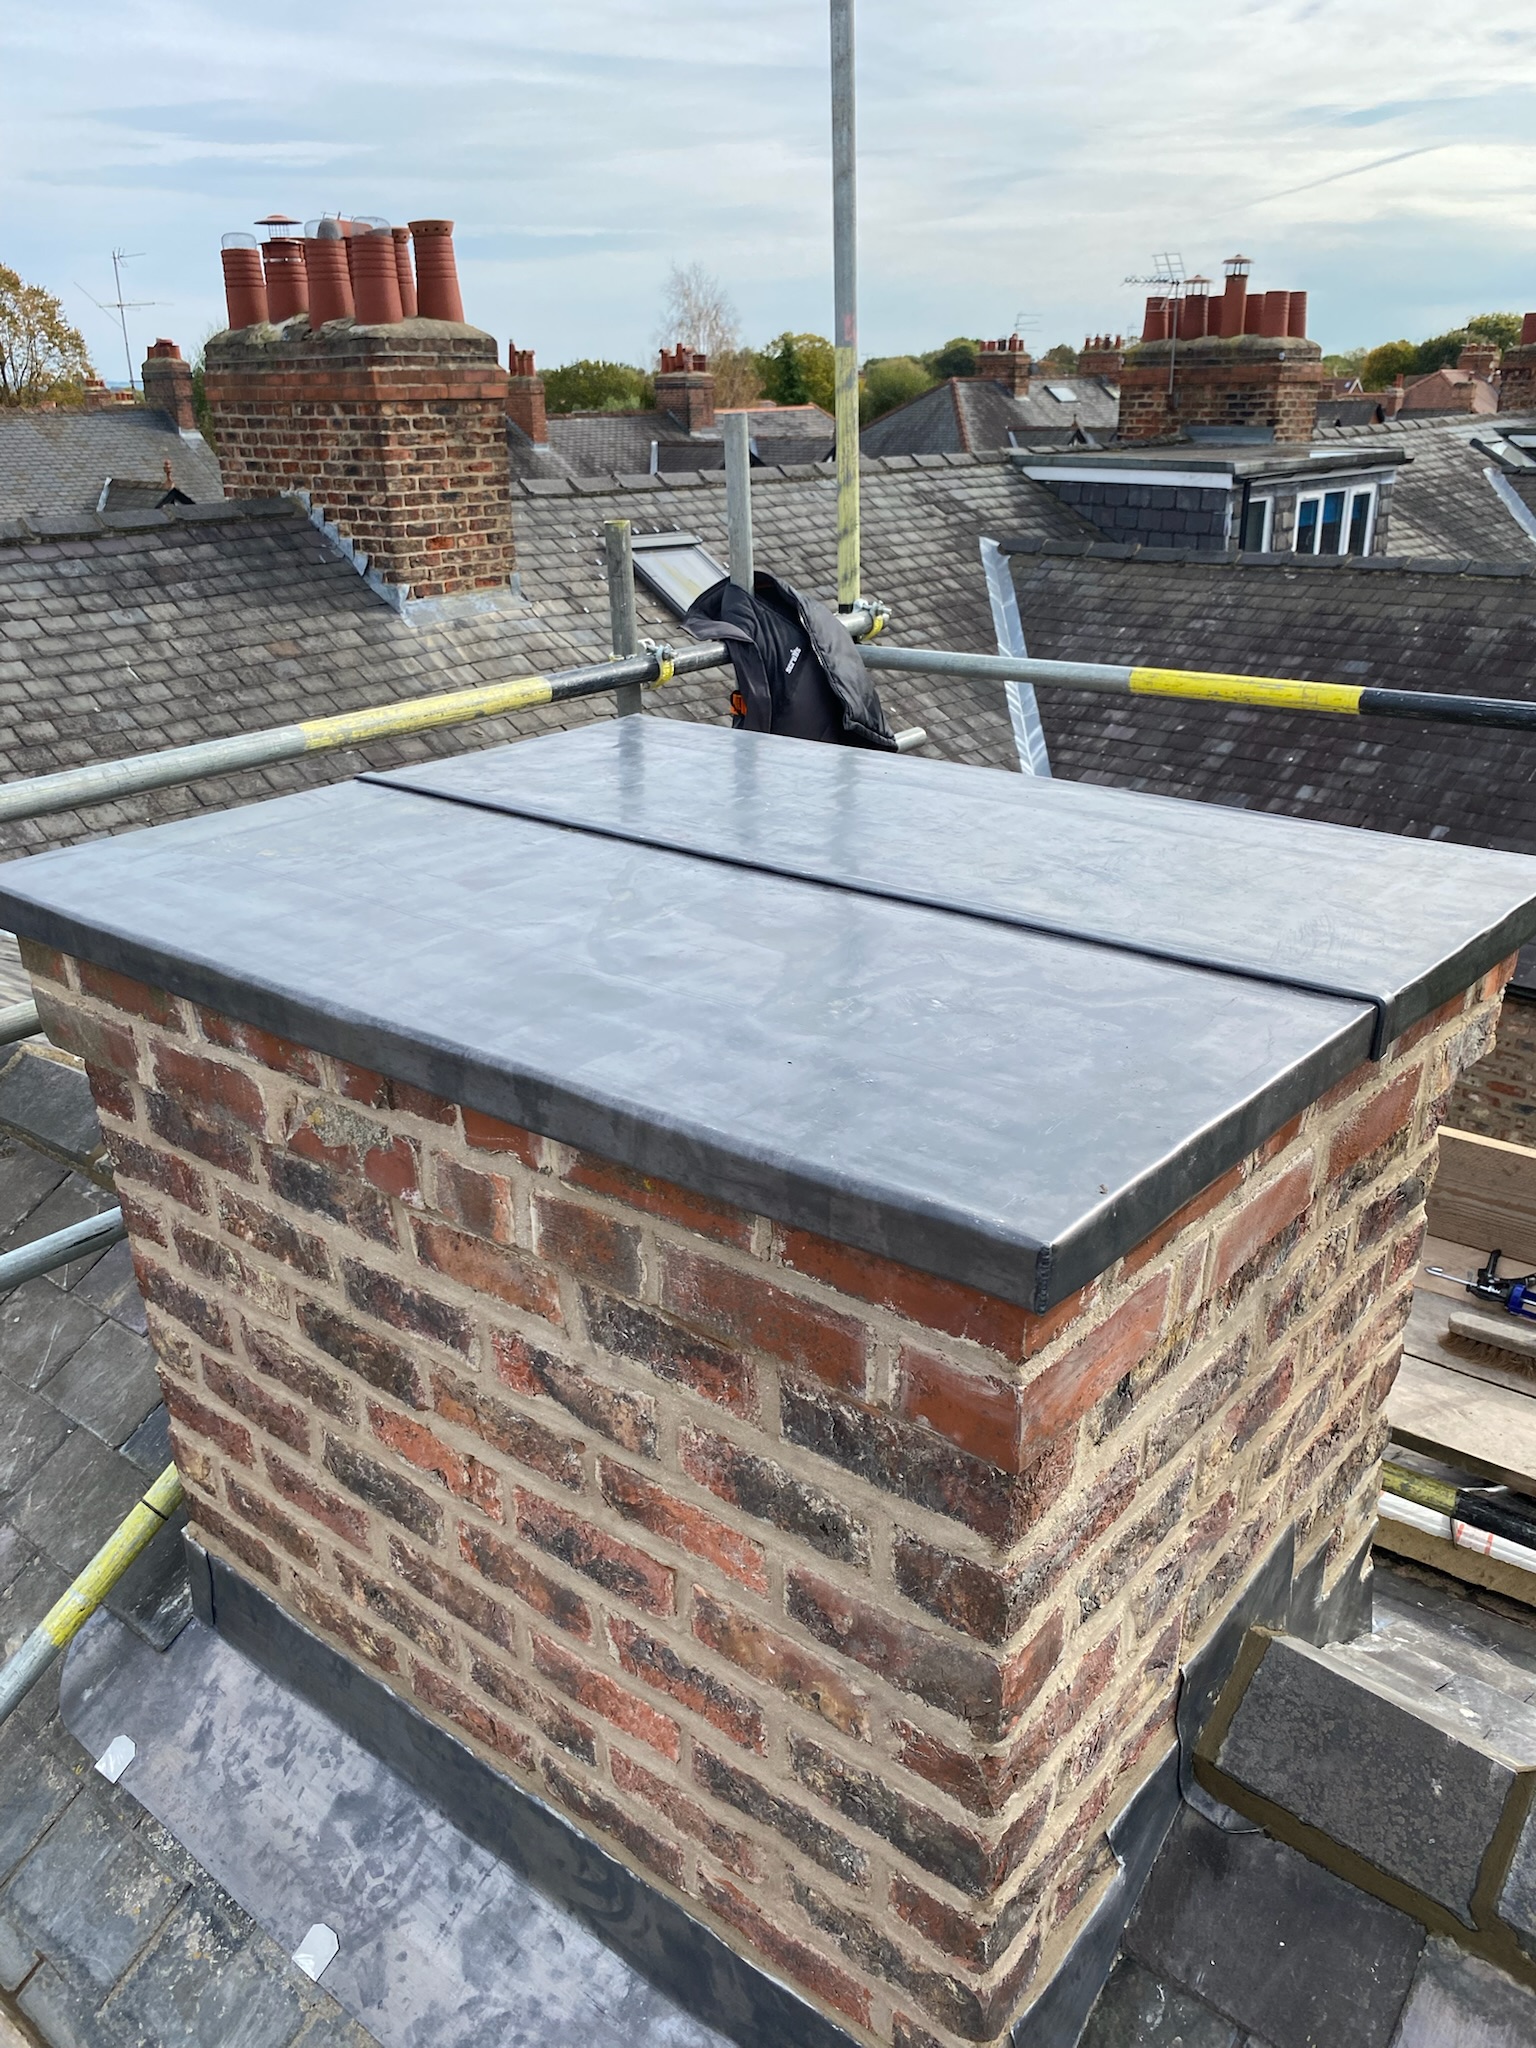
Because tiled roofs often have stronger profiles than slate roofs, the front apron and side details need to be formed with extra care. The visible line of the lead should look controlled and intentional, not over-worked or forced tightly into the tile pattern.
Chimney lead flashing on slate roofs and diminishing courses
Slate roofs bring a different kind of complexity to chimney lead flashing. The detailing may look flatter, but slate introduces its own discipline around cover, coursing and side integration. Where slates are diminishing, wider at the eaves and narrowing toward the ridge, the leadwork must still sit in harmony with the visual pattern of the roof while maintaining effective weathering.
Chimneys integrated with louvred vents or more specialist slate detailing need especially careful planning because the lead is no longer working against a simple repetitive covering. It is being asked to coordinate with multiple interfaces at once.


Chimney apron flashing – what it does
The chimney apron flashing is the front, downhill piece of the overall chimney detail. Its job is to weather the junction where the chimney meets the lower slope of the roof and to project water safely back out over the roof covering. It is one of the most visible parts of the chimney lead flashing system and therefore needs to look neat as well as perform well.
A front apron that is too short may struggle to shed water effectively over profiled tiles or may look visually mean on a larger stack. An apron that is overly large or poorly dressed may create unnecessary movement stress or simply look untidy. Good apron design is about proportion, not just maximum coverage.
Chimney back gutter – why the rear detail matters most
The rear of the chimney usually carries the most water pressure because it sits uphill and intercepts runoff from the roof above. That is why the chimney back gutter is often the most important single element of the chimney lead flashing arrangement. If the rear detail is too shallow, too narrow or formed without enough thought for the volume of water reaching it, defects are very likely.
On larger stacks, or where the chimney sits in a particularly exposed or complex roof position, the back gutter may need to behave almost like a miniature lead gutter system rather than a simple turned-up sheet. This is especially true where the rear detail feeds into a central gutter, valley or outlet arrangement.

What code of lead is commonly used for chimney lead flashing?
In many standard situations, Code 4 lead is the common starting point for chimney lead flashing. It provides a good balance of workability, durability and performance for exposed flashing details. However, that does not mean every part of a chimney detail should always use the same code. Broader aprons, heavier back gutters or more exposed roof locations may justify Code 5 or a more substantial detail depending on the specification.
| Chimney lead detail | Common lead code | Typical note |
|---|---|---|
| Front apron flashing | Code 4 / Code 5 | Depends on width, roof profile and exposure |
| Side step flashings | Code 4 | Often the standard exposed flashing code |
| Back gutter | Code 5 or heavier | Rear water load often justifies a more substantial detail |
| Soakers beneath side flashings | Code 3 | Common beneath a heavier exposed cover flashing where appropriate |
The correct answer always depends on the actual stack size, roof covering, exposure and geometry of the roof. That is why this guide should be read alongside Lead Codes Explained and Lead Flashing Sizes.
Chimney lead flashing installation basics
Good chimney lead flashing installation depends on clean chasing, sensible piece lengths, correct restraint and clear water paths. The lead should sit naturally within the detail rather than being forced into shape under excessive tension. Side flashings need to align properly with masonry joints, aprons need enough cover and rear details need enough depth to manage the water load arriving from above.
- Use sensible piece lengths that respect movement
- Coordinate step flashings with actual brick or stone coursing
- Provide enough cover over the roof finish for the profile involved
- Ensure the back gutter genuinely carries water around the stack
- Use appropriate fixing and finishing methods within the chase
Chimney lead flashing and buying decisions
Once the detail is understood, the next step is usually product selection. Buyers often arrive on a page like this because they want to know what kind of chimney lead flashing they need before ordering. The commercial route should be straightforward: understand the type of chimney detail, confirm the code, compare the width and then move into the Lead Chart to select the right rolled lead sheet.
Related products such as fixings, wedges, underlay and accessories should then be considered alongside the main lead order. For broader practical context, you can also use The Lead Handbook and the Lead Flashing section to support the buying process.
Further authority and pricing support
For applied leadwork authority, see GNR Roofing leadwork services. For broader leadwork reading, the wider Lead Lads leadwork guides and lead flashing pricing pages also provide useful context around specification, budgeting and workmanship.
Frequently asked questions about chimney lead flashing
What code of lead is usually used for chimney flashing?
Code 4 is often the common starting point for exposed chimney flashing work, but larger aprons or back gutters may justify Code 5 or heavier depending on the detail.
What is a chimney back gutter?
A chimney back gutter is the rear, uphill lead detail behind the stack. Its job is to collect and divert water safely around the chimney so it does not build up behind the masonry.
Can the same chimney flashing detail be used on tiles and slates?
The core principles are the same, but the formed detail often changes because tiles and slates present different profiles, cover requirements and visual conditions.
Why do chimneys leak even when lead is present?
In many cases the problem is poor detailing, poor fixing, inadequate rear weathering, insufficient cover or movement-related stress rather than the presence of lead itself.
Where can I buy lead for chimney flashings?
You can use the Lead Chart to compare code and width, then order the most appropriate rolled lead sheet for the chimney detail you need to form.
Why chimney lead flashing needs more thought than a standard abutment
A simple wall abutment typically asks the lead to weather one junction. A chimney asks the lead to weather several junctions at once, each with a different water flow pattern. The front of the stack needs a clean apron. The sides need a controlled, stepped or channelled interface. The rear needs a weathering arrangement that copes with concentrated runoff from the roof above. That is why chimney lead flashing deserves its own guide and should not be reduced to a generic “just flash it” approach.
Chimneys also tend to sit in visually prominent roof positions, which means poor detailing is easy to see. A good chimney detail should therefore satisfy both technical and visual criteria: it should weather correctly, move safely and look proportionate to the roof around it.
Chimney lead flashing and the importance of proportion
Good leadwork is often about proportion rather than excess. A front apron that is too slight may be technically weak, but an apron that is simply oversized without discipline can also look clumsy and may introduce unnecessary stress into the material. The same applies to side details and back gutters. The best chimney lead flashing sits naturally within the roof covering and the masonry geometry instead of looking forced into place.
This is one reason why real site experience matters so much. Practical leadworkers do not just ask “what code is this?” They ask “what is this stack doing to the roof?” and “what does this water path require?” Those are the questions that lead to better detailing.
How buyers should approach chimney flashing material selection
| Question to ask | Why it matters |
|---|---|
| What roof covering is involved? | Tile, slate and more specialist coverings all change the formed lead detail |
| How wide is the chimney? | A broader stack increases the demand on the rear weathering arrangement |
| Is the stack in an exposed location? | Exposure may justify heavier lead or a more robust layout |
| Will the back gutter discharge into another lead feature? | Complex outlet and central gutter connections require more careful design |
| Is the roof a repair, replacement or heritage project? | The specification and visual standard may differ significantly |
How this page fits the wider lead roofing guide cluster
This page sits naturally within the Lead Lads guide structure because chimney detailing is one of the most searched and commercially valuable parts of lead roofing. It links strongly into Lead Codes Explained, Lead Flashing Sizes, Order Lead Flashing, Lead Flashing and the wider parent hub at Lead Roofing Guides.
That makes it useful both as a user-facing guide and as an SEO support page that reinforces the whole lead roofing topic cluster around the shop.
Final thought
A strong chimney lead flashing detail is not just a small weathering feature; it is a complete mini-system of aprons, side flashings and rear drainage working together. When specified and formed properly, it becomes one of the most durable and visually appropriate ways to weather a chimney on a pitched roof. When treated casually, it becomes one of the most common sources of local roof failure.
Common chimney lead flashing repair scenarios
Many property owners first become aware of chimney lead flashing when a leak appears internally around the chimney breast or loft space. In reality the lead is often the final visible component of a much broader junction between masonry, roof coverings and structural timbers. When water begins to appear around the chimney, the cause is usually related to deterioration of the flashing arrangement, poor historic detailing or general roof movement over time.
Typical repair situations involving chimney lead flashing include:
- Apron flashing that has lifted or split after years of thermal movement
- Side step flashings installed too short into mortar joints
- Back gutters that were never deep enough to handle roof runoff
- Lead pieces that were over-fixed and therefore unable to move naturally
- Historic repairs using sealants instead of proper lead detailing
Where defects appear, the best solution is rarely a quick patch. In most cases the most reliable outcome comes from carefully removing the defective chimney lead flashing and reinstating the detail correctly using the appropriate lead code and geometry for the stack and roof covering.
Why professional leadwork detailing matters
Correctly installed chimney lead flashing can last many decades because lead is a highly durable roofing material with excellent resistance to weathering. The key factor determining longevity is almost always the quality of the detailing rather than the material itself. Good leadwork balances correct code selection, proper formation, sensible fixing positions and clear drainage paths around the chimney.
For real-world installation context, it can also be useful to review practical leadwork carried out by experienced contractors such as specialist lead roofing installers. Understanding how professional leadworkers approach chimney detailing helps explain why correctly specified chimney lead flashing performs so reliably when installed well.

