


 Code 3 Lead
 Code 4 Lead
 Code 5 Lead
 Code 6 Lead






Lead Sheet Sizes Explained – Widths, Lengths, Codes & Lead Roll Weights
Lead sheet sizes are one of the most important things to understand before buying rolled lead sheet. The correct size is not just about width. It also includes the lead code, the roll length, the weight per roll and the weight per square metre. Together, these tell you whether the material is suitable for flashings, valleys, gutters, bays, parapets and larger roofing details.
This page explains lead sheet sizes in a practical way, using the Lead Lads chart as a reference point for codes 3 to 8. It covers typical roll lengths of 3m and 6m, shows how size affects buying, handling and structural load, and explains why correct bay sizing and detailing matter just as much as the width on the roll.
If you already know what you need, go straight to the Lead Chart. For wider guidance, keep exploring through Lead Roofing Guides and The Lead Handbook.
What do lead sheet sizes actually mean?
When people search for lead sheet sizes, they often mean more than just the width of the roll. In practice, the size of a lead sheet product usually means four linked things:
- Lead code – which tells you the thickness and weight category
- Roll width – the width of the lead sheet supplied
- Roll length – commonly 3 metres or 6 metres
- Weight – both per roll and per square metre
Understanding lead sheet sizes properly helps you choose the right lead for the detail, avoid under-specifying the work and make sure the material can be handled safely on site.


Lead sheet sizes by code
One of the most useful ways to understand lead sheet sizes is by code. As the code increases, the lead becomes thicker and heavier. That influences how it performs, how it is handled and what types of detail it is normally used for.
| Lead code | Typical use | Why size matters |
|---|---|---|
| Code 3 | Soakers and lighter covered details | Light, workable and suited to smaller pieces rather than large exposed runs |
| Code 4 | Standard flashings and many everyday roofing details | One of the most useful starting points for general external flashing work |
| Code 5 | Wider flashings, valleys, gutters and more demanding exposed details | Heavier and more robust where additional durability is needed |
| Code 6 | Bays, parapets, gutters and specialist roofing details | Often selected to avoid over-complicated jointing on more substantial work |
| Code 7 | Heavy-duty roofing details | Used where stronger sheet weight and greater durability are needed |
| Code 8 | Large and highly demanding leadwork | A specialist option for heavier and more structural-style lead applications |
This is why lead sheet sizes can never be separated from code selection. A 600mm roll of Code 4 behaves very differently from a 600mm roll of Code 6 or Code 8. The width may be the same, but the weight, handling and application are not.
Lead sheet sizes by width
Roll width is often the first thing people think about when choosing lead sheet sizes. In reality, width should always be chosen to suit the actual purpose of the detail. Smaller widths may suit flashings and narrow interfaces, while wider rolls are more appropriate for valleys, gutters, bay roofs and parapet details.
| Typical width range | Common use | Lead Lads comment |
|---|---|---|
| 150mm–240mm | Soakers, step flashings, smaller cover flashings | Common in everyday roofing and chimney work |
| 300mm–450mm | Aprons, broader flashings, some valleys and interface details | One of the strongest buying ranges for domestic roofing |
| 500mm–750mm | Valleys, gutters, broader weatherings | Often used where drainage and open width matter |
| 900mm+ | Bays, parapets and larger lead roof areas | Usually tied directly to code and bay size requirements |
Lead sheet sizes by roll length
Most rolled lead sheet is supplied in either 3 metre or 6 metre lengths. That does not mean it should always be installed in those exact lengths. It means the roll is supplied at that source length, then cut to suit the detail and the correct bay size for the code being used.
This distinction is very important when dealing with lead sheet sizes. Buying a 6 metre roll does not mean you should form one 6 metre bay. It simply gives you a longer source roll to cut from. Correct bay size, movement control and jointing still have to be respected.
Why weight matters when choosing lead sheet sizes
A very important part of understanding lead sheet sizes is knowing how much the material weighs. The chart is useful not only because it shows width and code, but because it also gives:
- weight per roll – useful for transport, handling and site logistics
- weight per m² – useful for structural and substrate considerations
This matters on lead roofs, bays, parapets and gutter linings, especially where the substrate and supporting structure need to carry more than just the lead itself. Heavier codes can be extremely useful, but they also place more demand on the supporting structure and the way the work is planned.
Lead sheet sizes for bays and larger roof areas
Once you move beyond flashings and into lead bays, parapets and gutters, the relationship between size and bay design becomes much more important. Wider and heavier lead sheet sizes should be selected alongside correct bay spacing, steps, wood rolls and jointing methods rather than treated as stand-alone choices.
This is why the dedicated guide to correct lead bay sizes is such an important companion page. It explains how the correct code and maximum bay size work together when deciding whether wood rolls, steps or mechanical joints are needed.
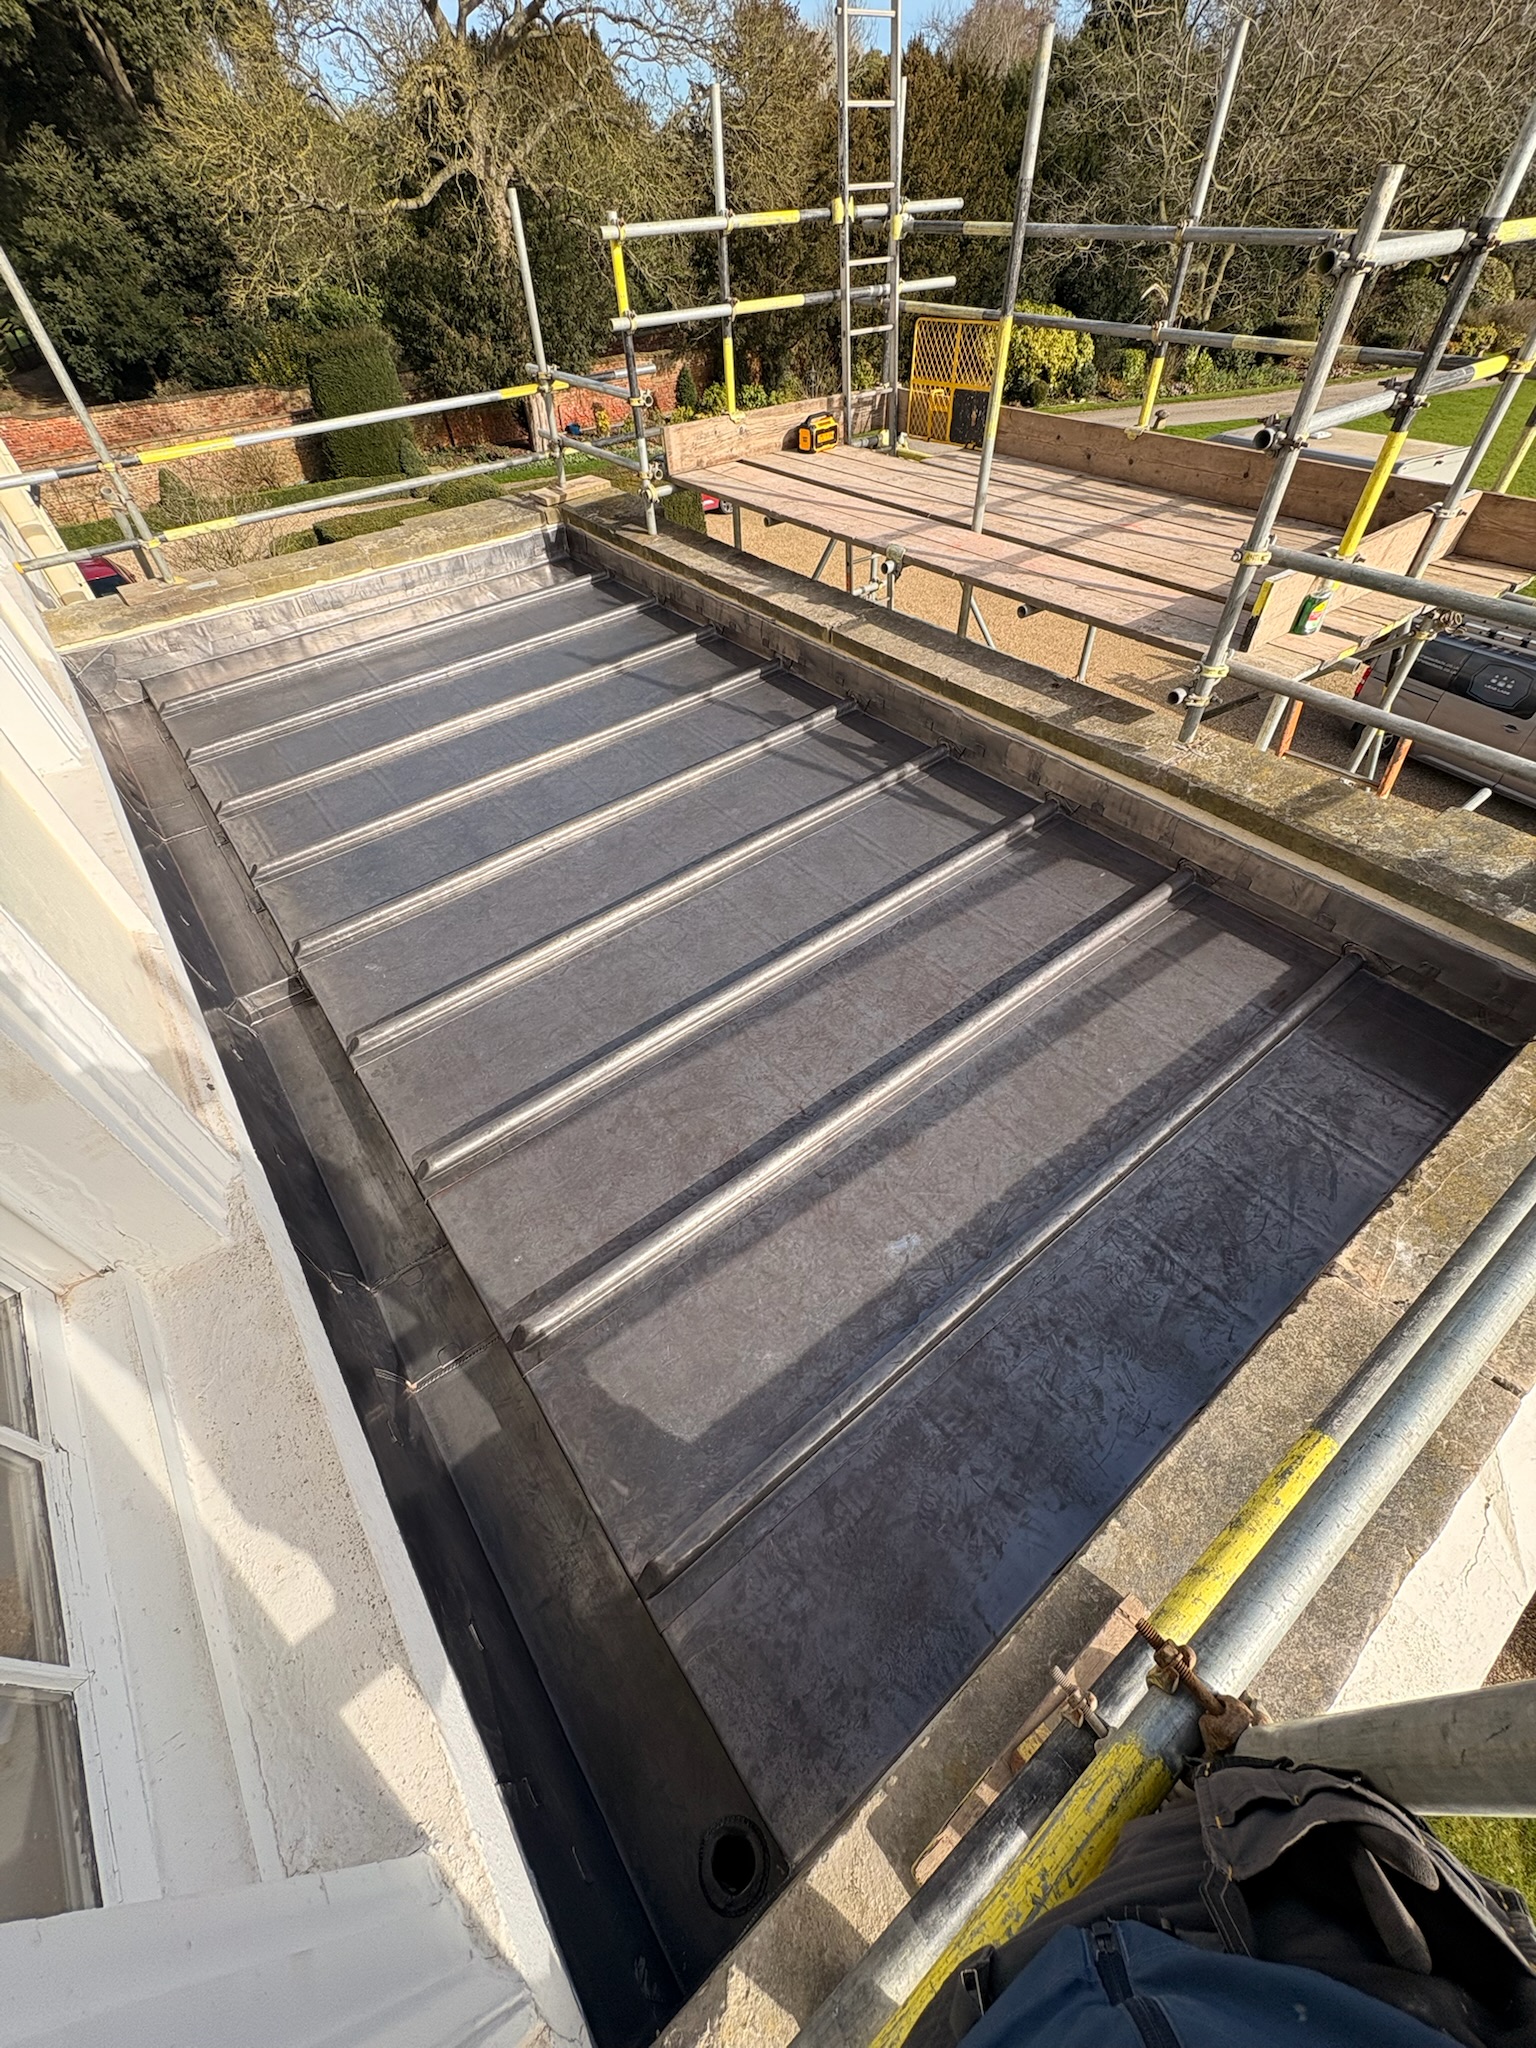

On projects like this, the right lead sheet sizes are not just about fitting the roof visually. They also affect compliance, movement control and how the lead can be laid without introducing avoidable stress.
Lead sheet sizes for valleys and specialist interfaces
Valleys are another excellent example of why lead sheet sizes need to be chosen intelligently. A valley lining needs the correct width for the roof geometry, the correct code for the expected performance and enough open capacity to manage water and debris.

This is why pages like Lead Valley Flashing matter so much. They help connect the chart to the actual detail, so buyers understand not just what size exists, but which size is likely to work best.
Most common lead sheet sizes in everyday buying
In practical Lead Lads buying terms, some lead sheet sizes come up again and again because they sit at the centre of everyday roofing demand:
- narrower Code 3 and Code 4 widths for soakers and stepped flashings
- Code 4 and Code 5 around 300mm to 450mm for aprons, cover flashings and many interfaces
- broader Code 4 and Code 5 for valleys and gutters
- Code 6 and above for bays, parapets and more substantial roof areas
The easiest way to compare these in one place is still the Lead Chart, which remains one of the strongest commercial tools in the whole Lead Lads ecosystem.
How to choose the right lead sheet sizes
If you are trying to choose between different lead sheet sizes, this is a sensible order to work through:
- Start with the detail you are forming – flashing, valley, bay, gutter or parapet
- Choose the correct lead code for the exposure and application
- Select a width that gives enough material for the real formed detail
- Check the roll length and remember that it may need cutting to suit bay size
- Review weight per roll and weight per m² where structure and handling matter
That logic helps avoid a common mistake: choosing lead sheet sizes purely by visual guesswork or by copying a previous job that may have had a different geometry.
Lead sheet sizes and compliance
On larger roof areas, the selection of lead sheet sizes should also sit within proper guidance on bay sizes, substrate design and movement control. The example roof above used a full warm roof substrate to BS 6229, with condensation risk addressed in line with BS 5250, showing how material size and roof build-up must be considered together rather than separately.
This is where practical roofing knowledge really matters. The right lead roll is only part of the answer. The supporting roof design, bay size and jointing method are equally important if the finished roof is to perform well over time.
Where to go next
Once you understand lead sheet sizes, the best next step depends on what you are trying to achieve:
- Order Lead Flashing – compare codes, widths and lengths quickly
- Correct Lead Bay Sizes – essential for wider lead roofs and bay work
- Lead Roofing Guides – broader technical guidance across the whole topic
- The Lead Handbook – your growing internal resource for lead roofing decisions
For wider reading beyond the shop, you can also explore:
Frequently asked questions about lead sheet sizes
What sizes does lead sheet come in?
Lead sheet comes in a range of widths and in common roll lengths of 3 metres and 6 metres. The full size also depends on the lead code, which affects thickness and weight.
Are 3m and 6m the installed lengths?
Not always. These are common supply lengths. The lead should then be cut and detailed to suit the actual purpose, bay size and jointing requirements of the roof detail.
Why does weight matter when choosing lead sheet sizes?
Weight matters for safe handling, transport and structural loading. It is especially important on larger roofing details such as bays, gutters and parapets.
What is the best way to compare lead sheet sizes?
The quickest route is the Lead Chart, because it allows you to compare code, thickness, roll length, weight per roll and weight per square metre in one place.
Do wider rolls mean larger bays?
No. Wider rolls and larger bays are not the same thing. Bay size still needs to follow correct guidance for the code and jointing method being used.
Lead sheet sizes at a glance
The main thing to remember is that lead sheet sizes are not just about width. The best choice depends on what you are building, what lead code is appropriate for the detail and whether the finished work needs cutting into smaller bays or panels to remain compliant and durable over time.
Smaller and lighter options suit flashings, soakers and narrower details, while wider and heavier rolls are more appropriate for valleys, gutters, bays and larger roofing work. The Lead Lads chart helps you compare all of this in one place, which makes it much easier to move from specification into ordering without guesswork.
If you are still comparing options, use the Lead Chart first. If you are planning wider roof work, read the Correct Lead Bay Sizes guide next. And if you want broader background and linked support pages, keep moving through Lead Roofing Guides and The Lead Handbook.
Why size selection matters in real roofing work
In day-to-day roofing, choosing the correct rolled lead sheet is rarely just a question of asking for a particular code and moving on. A leadworker, surveyor or contractor also needs to think about where the material will sit, how it will be formed, how much support is available beneath it and whether the finished detail needs to accommodate movement, drainage and loading over time. That is why understanding dimensions, roll weights and practical bay lengths makes such a difference when ordering.
On smaller details such as step flashings and soakers, the material can often be cut and handled quickly without too much difficulty. On larger details such as valleys, parapet gutters, bay roofs and broader weatherings, the relationship between width, code and weight becomes much more important. Heavier rolls are harder to move, more demanding on the structure and more sensitive to correct bay design, but they also open up stronger and more robust solutions where lighter material would not be appropriate.
Why professionals use charts and guidance together
A lead chart is extremely useful because it gives a quick reference point for code, thickness, roll length and weight. But in practice, charts work best when they are used alongside project-specific guidance. That is why it helps to pair the buying process with technical reading such as the Correct Lead Bay Sizes guide and the wider information held in The Lead Handbook.
For customers who want a broader understanding of how rolled lead sheet is used across roofing, these external resources are also genuinely useful:
- Lead Roofing Ultimate Guide 2026 – a broader look at lead roofing applications and good practice
- The Ultimate Guide to Lead Roofing – wider customer-facing guidance on how lead is used across roofs and weatherings
- GNR Roofing Leadwork Services – examples of applied leadwork and specialist installation expertise
Buying with more confidence
The biggest advantage of understanding these measurements properly is confidence. Instead of choosing by guesswork, you can compare options knowing why one roll is more suitable than another. That is especially helpful on projects involving structural considerations, awkward access, heavy valley linings, parapet gutters or larger lead bays where weight per square metre and maximum bay size matter just as much as visual coverage.
In many cases, customers arrive on a page like this simply wanting to know what sizes are available. What they usually leave with is something more useful: an understanding of how those sizes affect performance, handling and detailing. That makes the final purchase far more likely to be right first time.

